


When it comes to WordPress SEO, the software is actually quite good right out of the box (hey… even Google agrees). But, nothing is ever perfect and there are quiet a few quick and easy things you can do to optimize WordPress for SEO purposes. After all, what’s the point of having a site if no one views it? This article will walk you through 5 quick WordPress SEO steps for immediate impact and – in turn – provide a solid basis on which you can delve into deeper, more advanced SEO methods.
What do these tips cover? WordPress related items such as:
- Optimizing the WordPress set-up
- Helpful plug-ins
- Blog posting best practices
- Quickly getting up and running with WordPress SEO
What is not covered? Items outside of a WordPress-only guide, such as:
- Finding the right keywords
- Understanding Google Analytics data
- Advanced methods of SEO methodology
Got it? Good!
Before We Begin
One thing that is mandatory for any WordPress SEO is to have Google Analytics set-up and installed. What is Google Analytics? In a nutshell, it is a piece of site metrics software that provides site owners with an incredible amount of data on such things as:
- Who visits a site
- What they did while there
- Where they came from
- What brought them there
- And much more
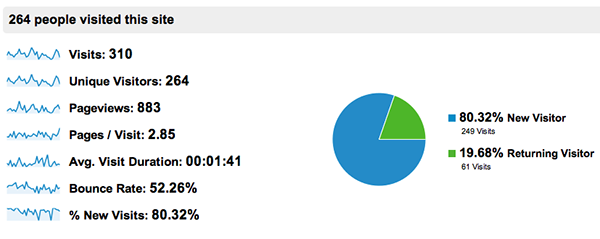
An example of the data that Google Analytics provides.
Many SEO experts suggest not doing any optimization until you have at least a few weeks of Analytics data under your belt. I will leave that up to you, but I prefer to get my SEO up and running as quickly as possible and let the results pour in. So, in our case, setting up and installing Google Analytics is the first thing we will do.
Begin by signing up for an account at the Google Analytics website. Click on “Create Account”. Or, if you already have an Analytics account, click “Sign In”.
Once there, easy to follow instructions are available on how to set-up the tracking code within your site and use Analytics itself. I highly recommend setting time aside to learn the intricacies of Analytics, as it will serve as an invaluable knowledge source down the road.
WordPress specific instructions on how to install Analytics tracking data can be found through-out the Web and are beyond the scope of this article. But, it is helpful to note that you can use three different methods to get the tracking code on your WordPress site:
- By using a plug-in such as Simple Google Analytics or Insert Headers and Footers
- By pasting it in your theme’s footer.php
- By adding the code into your theme’s functions.php file
Once the Analytics code is installed and properly reporting, it is time to make sure the data it provides is easy to access. You can do this by adding Google Analytics right into your WordPress dashboard. Here are two great plug-ins that do just that:
Now that we have our mandatory requirements out of the way, lets dig into the fun stuff.
Step 1: Add an SEO Plug-In

The Yoast WordPress SEO plug-in gives you awesome control over your WordPress SEO.
Why would adding yet another plug-in be our first step in WordPress SEO? Because adding an SEO plug-in will make the following techniques much more easy to accomplish. They give you the ability to do such things as:
- Set page titles and descriptions
- Edit Robot and HTML access files
- Install XML site maps
- And much, much more
Further, they give you “fine grain” control over how your posts appear to search engines.
So, which are the best? The consensus of both professionals and users usually include one of the following:
The merits of each can be argued for a millennia. But, for simplicity’s sake, think of the All-in-One plug-in as slightly more simple and easy to use, while the Yoast plug-in provides a powerhouse feature set. My two cents? Go with the Yoast plug-in, unless you will not be diving into the deeper waters of SEO. In this case, the All-in-One plug-in will suit your needs just fine.
Step 2: Change the Default Permalink Structure
The default WordPress permalink structure is… Well, lacking to say the least. Let’s begin this step by looking at the default structure, why it is insufficient for our needs, and what we can do to correct it.

The default WordPress permalink structure stinks
Log into your WordPress dashboard and click Settings > Permalinks. Once there, you will see the default is “?p=123″. This default is bad for SEO, as it is a non-descriptive title. A URL such as www.YourWebsite.com/?p=156289 does nothing for search engines or site visitors.
Instead, remember three things about your post links. They should be:
- Easy to understand and describe what the page is about
- Include feature rich keywords
- Timeless and not dated
So, let’s fix this by changing the default from “?p=123″ to either “/post-name/” or “/category/post-name/”. Which one is best for you? It depends on the size of the site. If you have tons of content, pages, and posts, I would suggest “/category/post-name/”. But,if you are under 1000 pages, I would simply use “/post-name/”.
After choosing which is the right structure for your site, add it into the “Custom Structure” field and you are done! But, one word of warning… Remember that you are changing the links to all your site’s posts and pages! If you are switching from the default structure, chances are you will be fine. But, if you are switching from a different permalink type, you will need to add in the proper redirects to ensure that your pages and posts can be found when they have been externally linked to or referenced.
There are two methods with which to do this:
- Edit your .htaccess file (see the great Yoast tool for this)
- Use a redirection plug-in (such as Redirection)
When done, remember to test, test, test!
And, now, with a proper link structure in place, let’s look at best practices for optimizing page titles. Which, in turn, will allow us to generate the best link names.
Step 3: Fix your Page Titles
Correctly naming your page titles is considered one of – if not the – most important steps in SEO. The reason? When performing searches, people scan the first words of a page (or their search results) to see if it is relevant to their needs.
Thus, proper page titles bring in more relevant site traffic and – as an extra bonus – search engines give higher weight to posts that do this. So, always include the most important 1 or 2 keywords up front in your post or page name.
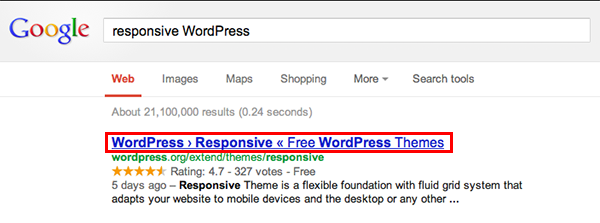
An example of how Google displays page titles
It is interesting to note that the majority of websites use something along the lines of “Company Name | Post/Page Title”. But remember the tip above… We need to use important, relevant keywords first, not last. Following this rule of thumb, a post/page name of “Responsive WordPress Design | Company Name” is much better, as the keywords are right up front and you still can keep your branding in the page title.
Extra tip: For more suggestions on great ways to name blog posts, visit the excellent SEOBook article on the subject.
To easily set your page titles, go to your SEO plug-in settings area and change the structure there. Both the All-In-One and Yoast plug-in provide a default page title option, which can be then overwritten on individual pages and posts if you so choose. Please refer to the plug-in’s documentation on where you can manage these settings.
Step 4: Set Proper Meta Descriptions
A meta description is what shows under the page title in search results. The value of this is self-evident, as it explains the “what” and “why” of the link, as well as having a very influential effect on whether someone clicks through to your link or not. By default, search engines will typically grab the first few lines of the page to use as this description, so it is important to manually set these within your SEO plug-in (refer to the plug-in documentation for where to do this).
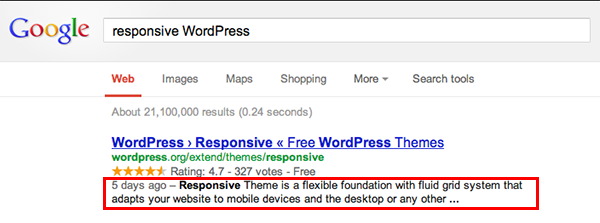
An example of how Google displays meta descriptions
When writing your page meta description, think to yourself, “If I was searching for this post, what words would I use to search?” After deciding on these keywords, write a description that both entices and contains these main keywords so they are optimized for those that you are targeting as an audience.
Extra tip: For more ideas on writing great descriptions, refer to SEOMoz and their fantastic guide.
Step 5: Optimize Your Images
Our final step is simple and should – in theory – already be in practice on your site. But, just in case, it is important to remember to always name your image files properly. Whereas, “Picture.jpg” tells the user and search engine nothing about the image itself, “MiamiDolphinsQuarterback.jpg” tells them so much more. Both users and search engines appreciate this and will reward you with more traffic and higher search results!
After this is done, move onto the ALT image title. As before, an ALT tag name of “Picture” or “Image” does not tell users or search engines what the image is about. But, something like “Miami Dolphins Quarterback Ryan Tannehill” is much more informative and will positively effect your SEO. Their is even a helpful plug-in to automate your ALT tagging.
The same principles apply for setting a proper Title tag for your images, so we won’t go into any more detail there. But, what is important to point out are your image captions. Surprisingly, many SEO experts say that the image caption is the next most important thing for SEO after proper page titles. So, be concise, yet descriptive of your image, using targeted keywords wherever possible.
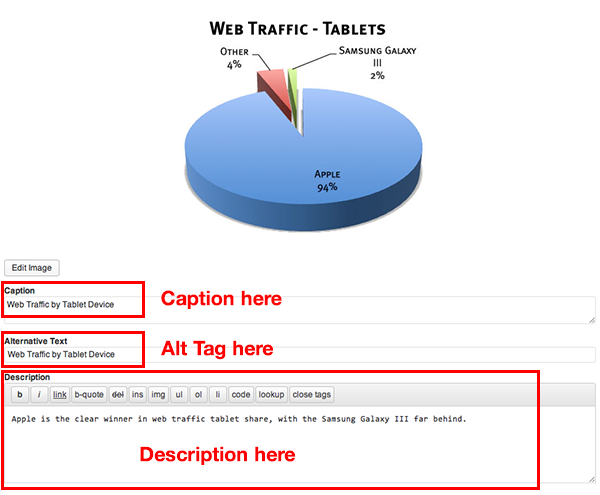
WordPress makes it a snap to edit an image’s caption, Alt tag, and description
Finally… Two reminders:
- Never resize images: If the final image will be displayed at 250px x 250px, place it cropped to those dimensions.
- Always compress images: Their is no excuse to having bloated image file sizes, especially considering that there are such handy, free tools readily available (Picnik and ImageOptimizer come to mind).
Conclusion
Out of the box, WordPress is great for SEO. Yet, combined with the techniques above, WordPress can become a powerful SEO tool. By using SEO plug-ins, choosing a correct permalink structure, writing proper page titles and descriptions, and handling your images properly, you will be well on your way to seeing a boost in your search engine traffic.
So, sit back and reap the benefits of your newly optimized WordPress site and remember to continue to analyze Google analytics to see what is working and what is not!